- Wed 21 August 2024
- Blog
- #Git, #Programming, #Tutorial
Git is great. As a distributed version control system, in theory, there doesn't need to be a centralized server like you used to have with old version control systems like CVS or SVN, but in practice it's actually very useful to centralize. Having a single point of truth is useful for collaboration, automation, and keeping the state of the repository straight in your head. Github is typically that spot for most projects, and it should be! It's free, has a built-in bug tracker, CI system, and reasonably nice interface for documentation. The thing is, if you don't want to share the contents of your repository because you want to sell it, or just because it's idiosyncratic and not worth sharing, putting it on github isn't going to work for you.
If you don't want that, what you want is to set up a centralized repository of your own. It would be nice if you could access that from multiple machines on your network as well, say if you've got a desktop and a laptop, and you want the option to use both (without needing to make a dedicated server machine). I found myself in that exact situation, and if that's what you want too, you're in luck, because it's not that hard to set up.
On Linux they've got this covered, but before I wrote this, I found doing this well on Windows to be a topic with stunningly little trustworthy documentation online. This is my attempt to resolve that.
Overview
The idea is that we'll designate one computer on your network as the server for git. It's intended for this to be your regular desktop machine, but on this computer, you'll install an SSH server. This is how all computers (including the desktop itself, to keep the workflow the same) will access git. Integration with SSH is built into git, so it's easy to use. To keep this bulletproof from a security point of view, we'll set up the SSH server so it's inaccessible without a pre-approved key which you put on the server by hand, and password authentication will be turned off entirely.
Note that I'm using Windows 10 for this tutorial, but these instructions should work without modification for Windows 11.
There's a number of terminal commands in this tutorial. You don't need to be a terminal expert, but as a convention, if the output of the command isn't very interesting (or if there isn't any), I won't include a screenshot for it. This can make it ambiguous if you're getting the command right, since you can't see what output I got, but as a rule, error messages for these commands are pretty obvious. If you get something that looks wrong, it probably is.
I'm writing this tutorial with the assumption that you already know how to use git, and just want to know how to set it up in this particular way, so I won't go over git usage once a repository is cloned.
Server Setup
Only your server machine will need to follow these steps.
- Install Git for Windows
- Install Bitvise SSH Server
This section will set up your machine for when you're using git on the server machine as a client (remember we don't have a dedicated server in this setup), so you don't need to follow the instructions in the Client Setup section for this machine.
Setup static IP
First of all, since clients (including this machine) will be connecting to your machine over SSH on your local network, you'll need a static IP. It's extremely likely that you have a NAT router, and if you're in the target market for this tutorial, it's also pretty likely you already have this set up, and can skip this section. But, we'll go over it anyway for those who don't. If you don't have this setup, it's pretty easy, doesn't require access to your router's admin interface, and has beneficial effects like better support for port forwarding.
This tutorial shows screenshots from Windows 10, but the processes in Windows 7, 8, or 11 are mostly the same.
Before we change anything, let's look up your current settings; we'll mostly be copying them. This is easiest to do in a terminal by running ipconfig. It should show you your current network setup:

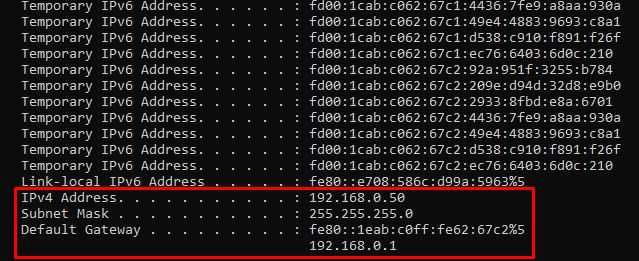
As you can see by the spammy output I've mostly omitted, my router assigns me both an IPv6 address and an IPv4 address. If yours is the same, you can scroll past most of that to get to the IPv4 information I have highlighted.
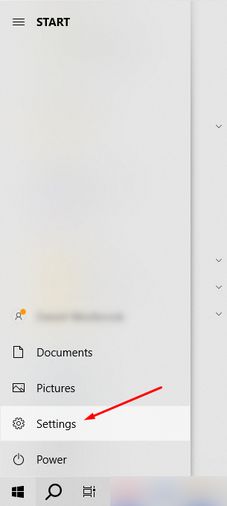
Now, under settings
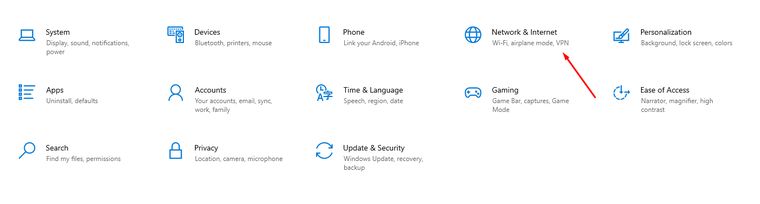
Network & Internet
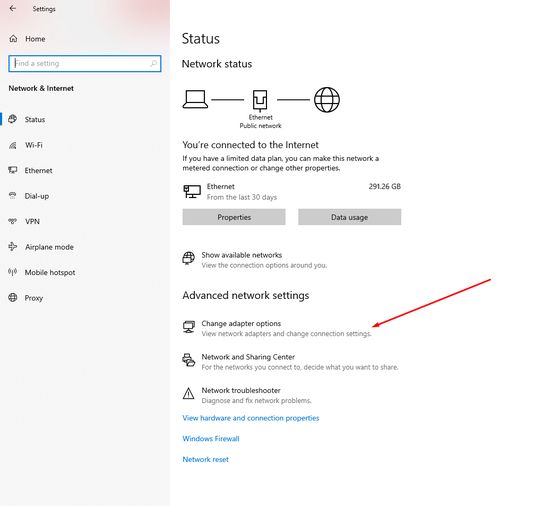
Change adapter options
Find your active connection.
Based on your computer's hardware, your screen may look different. Here I'm using ethernet, you may be using wifi. It doesn't matter, just choose whichever one is active, which you can determine based on the lack of a red X on the bottom left of its icon.

Right click -> Properties
Find Internet Protocol Version 4 -> Properties
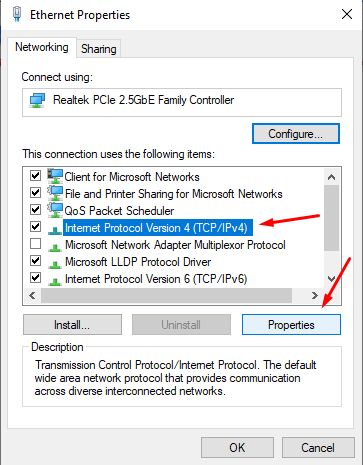
Check Use the following IP address and Use the following DNS server addresses.

Enter the IP address you want and copy the subnet mask and default gateway you had before. IP addresses on local networks typically take the form 192.168.0.x, where x is assigned by your router in a first come, first served fashion. Since you're assigning a static ip, you'll replace x with a static value.
Keep in mind, only one computer on the network can have this address, so pick something your router isn't likely to give another machine. They typically just assign IP addresses sequentially starting at 1, so I picked 50.
Under Preferred/Alternate DNS server, you can enter what you used to have, based on the output of ipconfig above (this is probably a DNS server provided by your ISP), or you can use a famously reliable and fast DNS server run by Google at 8.8.8.8 and 8.8.4.4. You may find using them to be an upgrade over your ISP's DNS servers, but you do have to understand that Google runs it and can see all the DNS names you're looking at, so caveat emptor.
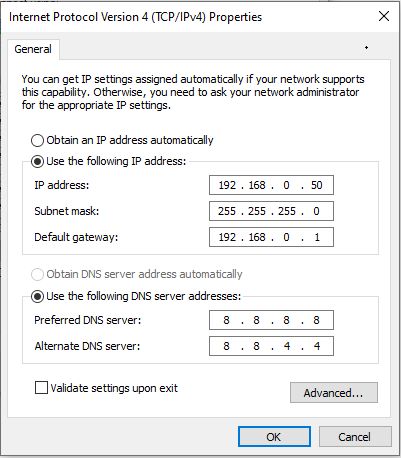
Hit OK and you're done.
Setup Git
First, some configuration so git knows who you are. If you're used to using github, you've probably already done this.
Run the following commands in a terminal:
git config --global user.email "email@example.com"
git config --global user.name "John Everyman"
(Obviously, substitute your information in the email and name)
Setup Repositories
We'll now setup the central repositories.
First, go into your user home directory. That's located at C:\users\[your user id]\. Make a new folder in there for the central repos to live in. You can call it anything, but avoid using spaces, since they make the folder annoying to access in terminals. I just named mine "git". The location for this folder in the user home directory is relatively important, because the path to the folder will be used by all the clients. If it's in the home directory, it can be abbreviated as ~/git, which is nice and short.
Next, you'll need to do this for each individual repository you want to make available. In a terminal, move into your new folder (my username is dan):
cd c:\users\dan\git
And initialize your new repository.
git init --bare example_repo
Git's "bare" mode is specifically made for this use case. Just the repo itself, and not a working copy of the files in the repo will be written here, so it saves space. When you want to do dev work, you'll clone this repo, do the work there, and push to this central repo.
I wouldn't worry about the size of the repositories when you have both a working copy and a copy in this central repository. Git is extraordinarily efficient when handling repositories which are predominantly text. The size can creep up when storing images and other non-text data, but in my experience the disk size still really isn't a big concern.
Setup Keys
To connect to our SSH server, we're going to give it our public ssh key, which is both more secure and more convenient than an ssh password. A single command will generate your private and public key:
ssh-keygen -t rsa -b 4096 -C "put identifier here"
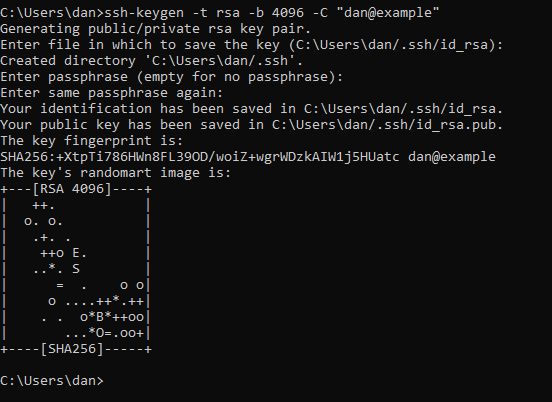
The identifier can be anything useful to you as a description of what the key is for. I use dan@{computer name} for my keys.
It will ask you to provide a password for your private key. You should give it something secure.
It will put the private and public key in C:\users\[your user id]\.ssh\ by default. Since git expects it to be in this location, you should use the default.
Setup SSH Server
Like I listed in the installation section, we'll be using the Bitvise SSH Server to actually allow us to connect to this machine. SSH is a flexible protocol allowing you to log into the machine and run console commands over the network, which is nice to have access to in general, but git also uses it to do its job. The way we set this up will allow you to do both.
I chose Bitvise SSH Server because, while it's paid software for commercial use, it's free for personal use, and you don't need to give them any information to download and use it. The UI is usable enough, and assuming you don't constantly setup new computers, after initial setup, you don't really ever have to touch it again.
There are open source alternatives that run on windows, but a prerequisite for being included in this tutorial is that you don't need to compile anything, which at the time of writing disqualifies every single one of them. If you're a user or maintainer of a project that fits this bill and would like me to possibly list it here as an alternative, feel free to hit me up.
A note about security
The astute among you may have winced at the above explanation. Yes, it lets you run console commands over the network. Unless you're careful, this is, in general, a very bad idea, which is why we're going to lock this thing down to a degree most SSH admins would consider overkill.
We're going to completely disable regular password based authentication, and only allow authentication via PGP, using those keys we generated above. When you set up a new machine to connect over SSH, you'll generate a public and private key, manually copy the public key file over the network, and install it into the ssh server. From that point forward, in order to authenticate, any machine must have an approved SSH key on the server to authenticate. There will be no amount of brute forcing that will allow attackers to bypass this. Conceivably, they could steal your laptop or hack your server machine through other means, get ahold of your ssh key, and use that to log in. But if they've done that, they already have your machine. Therefore, I feel pretty confident in saying this approach doesn't meaningfully increase your security attack surface. That said, do make an effort to keep it up-to-date.
If someone does steal your laptop with one of the keys on it, you can go into the admin interface and simply remove that key from the whitelist. This will seamlessly prevent them from actually using it, without you needing access to the compromised machine.
Server Setup
Luckily for all of us, the default settings on bitvise aren't too bad.
To open the admin interface to bitvise, there will be an icon in the taskbar in the bottom right. If you double click it, it will open this screen:
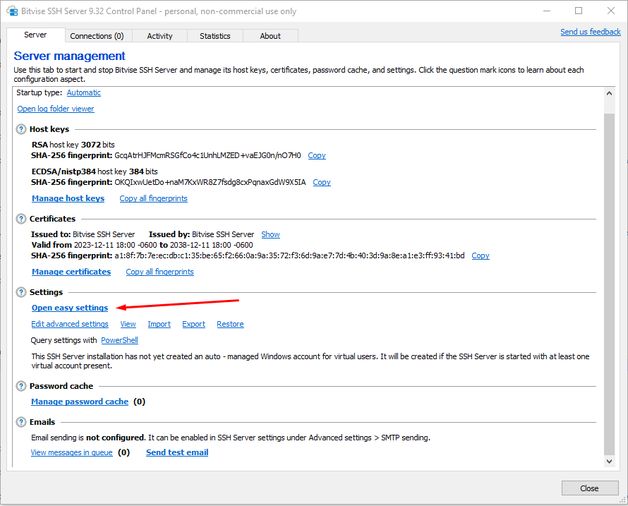
Hit that big "Open easy settings" link, and change the highlighted entries:
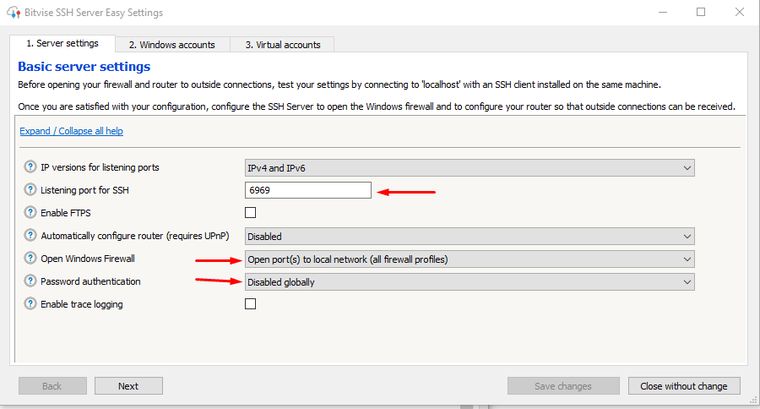
The listening port should be something other than 22, to avoid attracting attention from automated ssh brute forcing (not that they'll get anywhere with password authentication disabled, but still). Password authentication is disabled entirely based on our strategy in the security section above, and the Open Windows Firewall option should open it to all firewall profiles to allow other client machines to connect.
Along the top, open the Windows Accounts tab:
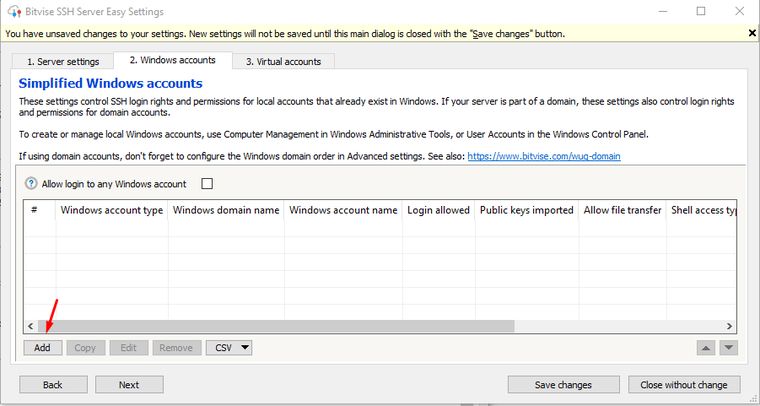
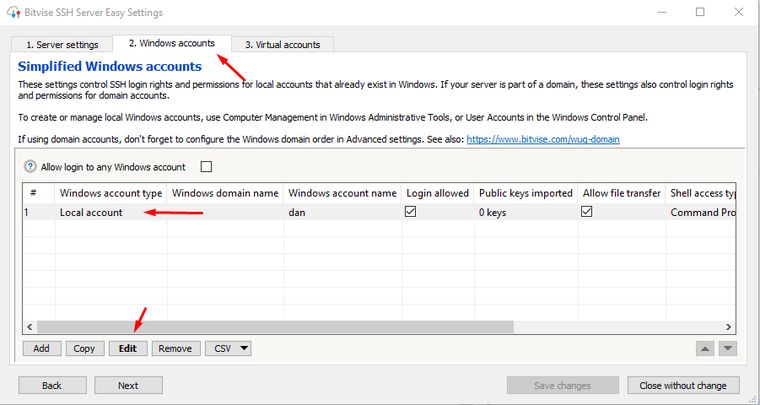
Unless your machine is very strangely set up, there's only going to be one available (active) account on your machine, but we'll need to add it to bitvise explicitly.
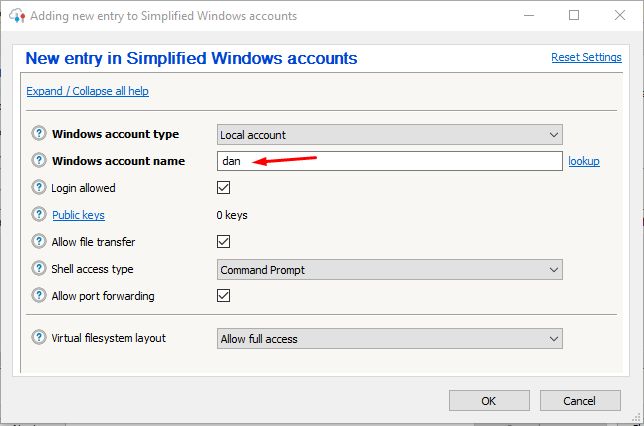
Click the add button, and fill in your account name. The default settings will work fine:
For server setup, that's it.
Setup client public keys
To setup each client machine (including the one the server is on), open the admin interface:
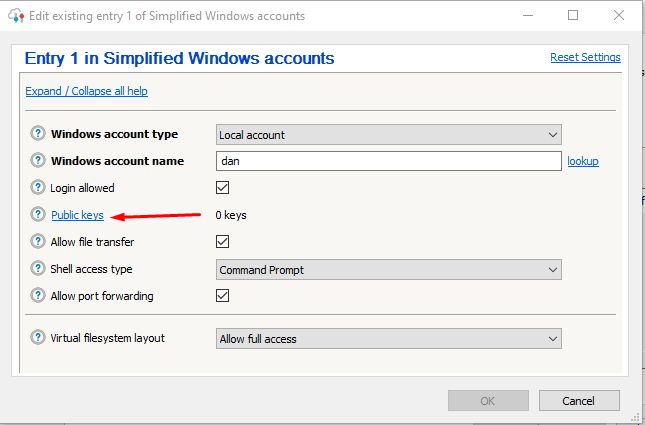
Open the easy settings, go to the windows tab, select your account, and hit edit:
Open the Public keys link:
Click the import button:
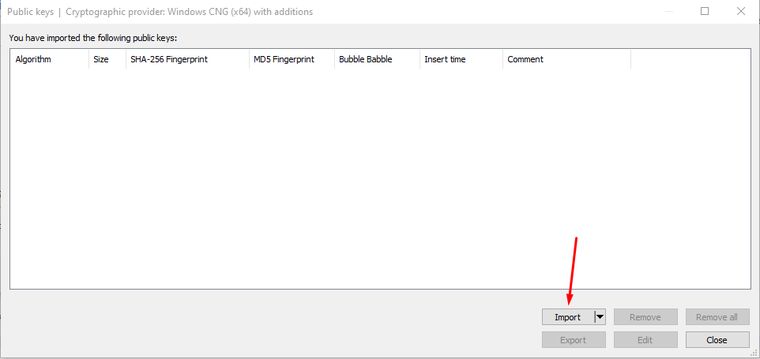
Locate the ssh public key file you want to add.
If you're adding the key for the server machine, that will be in C:\users\[your user id]\.ssh\, if you're adding a client machine's key, that file will be one you've transferred yourself.
That's it. Hit close and save in the parent dialogues, and you're set.
Use It
Now that we've done all this setup work, getting access to a repository is easy.
git clone ssh://dan@127.0.0.1:6969/~/git/example_repo repo_name
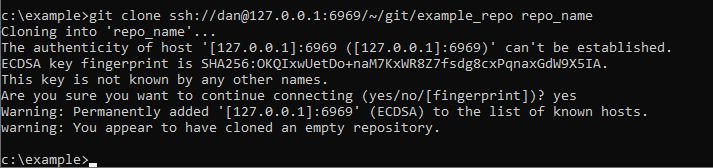
In the above command, dan is my windows account name on the server machine. 127.0.0.1 is the ip address for the local machine you're on. 6969 is the port you chose while setting up ssh. example_repo is the name of your repo from the Setup Repositories step. repo_name is the name of the folder you want to clone into.
That'll clone the example repo with a regular working copy into a folder named repo_name, and you can use git in this folder as usual. Running pull or push will automatically connect to your ssh server and connect to the central repo.
The first time you connect to the server, it will ask you to confirm the server's authenticity, but it won't ask you that in the future. If everything is set up correctly, it shouldn't ask you for a password.
Client Setup
Each machine on your network other than your server machine will need to follow these steps:
- Install Git for Windows
Setup Git
First, some configuration so git knows who you are. If you're used to using github, you've probably already done this.
Run the following commands in a terminal:
git config --global user.email "email@example.com"
git config --global user.name "John Everyman"
(Obviously, substitute your information in the email and name)
Since I'm the same person no matter the machine I'm using, I use the same information on the client machines that I use on the server machine.
Setup keys
To connect to our SSH server, we're going to give it our public ssh key, which is both more secure and more convenient than an ssh password. A single command will generate your private and public key:
ssh-keygen -t rsa -b 4096 -C "put identifier here"
The identifier can be anything useful to you as a description of what the key is for. I use dan@{computer name} for my keys.
It will ask you to provide a password for your private key. You should give it something secure.
It will put the private and public key in C:\users\[your user id]\.ssh\
Copy public key to the Server
Take your public key (the .pub file in the .ssh folder) from the above step, and transfer it to your server with whatever file transfer method you like best. It's called a public key for a reason, so you don't need to be worried about someone bad getting their hands on it, so putting it on dropbox or google drive or something like that is just fine.
On the server, once you have the key on it, follow the instructions under "Setup client public keys" above.
Use
Now that we've done all this setup work, getting access to a repository is easy.
git clone ssh://dan@192.168.0.50:6969/~/git/example_repo repo_name

In the above command, dan is my windows account name on the server machine. 192.168.0.50 is the static ip you set up earlier. 6969 is the port you chose while setting up ssh. example_repo is the name of your repo. repo_name is the name of the folder you want to clone into.
That'll clone the example repo with a regular working copy into a folder named repo_name, and you can use git in this folder as usual. Running pull or push will automatically connect to your ssh server on your server machine and connect to the central repo.
If this is the first time you've connected to that machine over ssh, you may be prompted to authorize the host (this screenshot doesn't show that).